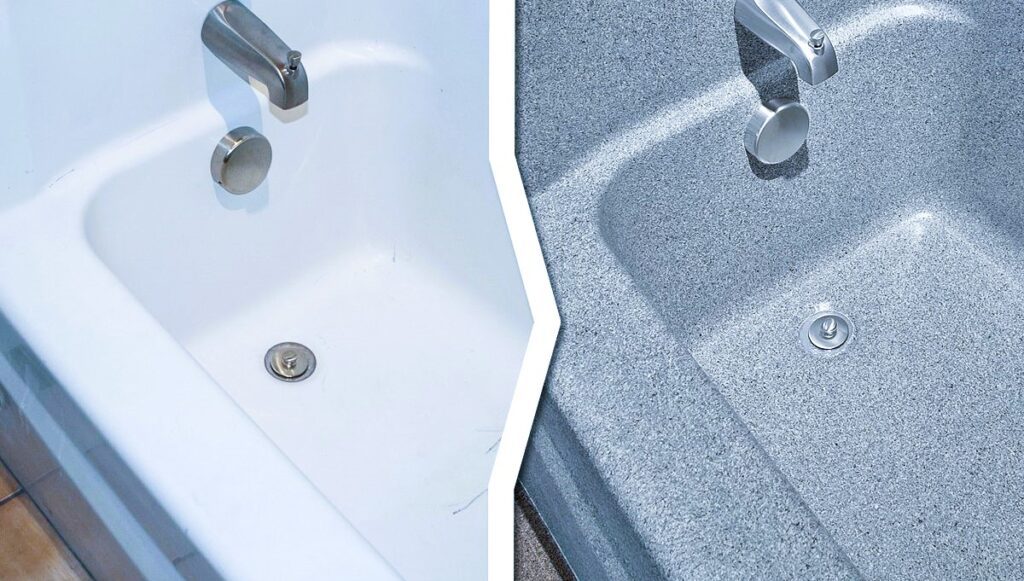
A bathtub is one of the most used fixtures in your home, and over time, it can start to look worn out. Chips, stains, and dull finishes can make even the cleanest bathroom feel outdated. But here’s the good news: you don’t need to replace your bathtub to restore its beauty. With a bit of effort, you can renovate your bathtub and give it a fresh, new look, saving both time and money.
Renovating a bathtub might sound intimidating, but it’s a straightforward process if you have the right tools and knowledge. Whether you want to fix minor damages or completely refinish the surface, this step-by-step guide will walk you through the process. Ready to bring your bathtub back to life? Let’s get started!
Table of Contents
Why Renovate a Bathtub Instead of Replacing It?
If your bathtub looks old and tired, you might be tempted to replace it. However, renovating your bathtub is a far more cost-effective solution. Here’s why you should consider renovation over replacement:
- Cost-Effective: Bathtub replacement can be expensive. You not only have to buy a new tub, but also factor in labor costs, plumbing adjustments, and potential repairs to surrounding areas. Bathtub refinishing or resurfacing, on the other hand, is much cheaper and delivers excellent results.
- Less Disruption: A bathtub replacement involves tearing out your old tub, which can disrupt your bathroom for several days or even weeks. Renovating a bathtub takes far less time and allows you to have your bathroom back in use within a couple of days.
- Eco-Friendly: By choosing to refinish your existing bathtub, you’re keeping it out of the landfill. Renovating reduces waste and uses fewer materials, making it a more sustainable choice.
- Aesthetic Upgrade: Renovating your bathtub can give it a new, glossy finish, making it look like a high-end fixture. You can also customize the finish to match the style of your bathroom.
What are some ways to renovate a bathtub?
Types of Bathtub
Before diving into the step-by-step process, it’s important to understand the types of bathtub renovation options available. Depending on the condition of your tub, you may choose one of the following:
- Bathtub Re-glazing: This process involves applying a new coat of :enamel or acrylic on the surface of the tub. It’s a great option for tubs with minor scratches, stains, or discoloration. Re-glazing can make your bathtub look brand new again.
- Bathtub Liner Installation: A bathtub liner is a custom-made cover that fits perfectly over your existing tub. It’s ideal for tubs with significant damage or for those looking for a quick fix without the need for intensive labor. However, liners can be more expensive than refinishing.
- Full Tub Replacement: In cases where the tub is severely damaged or beyond repair, replacement may be the best option. This is the most expensive and time-consuming option, so it’s usually a last resort.
For most people, bathtub refinishing or re-glazing is the best solution. Let’s focus on this DIY approach and walk you through the process.
What tools do you need to renovate a bathtub?
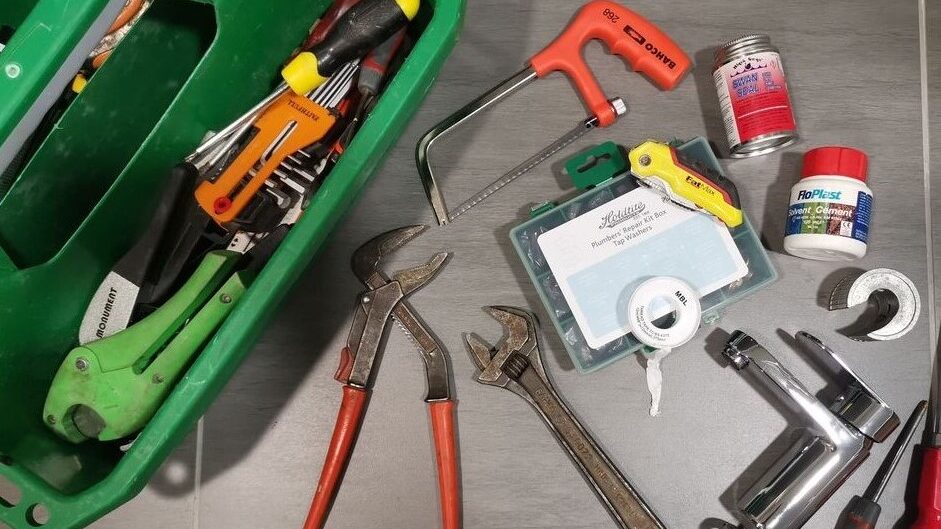
Before you begin, gather all the necessary tools and materials to make the process smoother. Here’s what you’ll need for a bathtub renovation:
- Bathtub refinishing kit (includes primer, epoxy paint, and finishing tools)
- Sandpaper (various grits)
- Painter’s tape
- Drop cloths or plastic sheets
- Protective gear (gloves, mask, goggles)
- Heavy-duty cleaner
- Tub repair kit (for chips or cracks)
- Caulking and caulking gun
- Sponge and cleaning rags
Having the right tools is crucial for a successful project, so ensure everything is on hand before starting.
What are the key steps involved in bathtub renovation?
Step 1: Assess the Condition of Your Bathtub
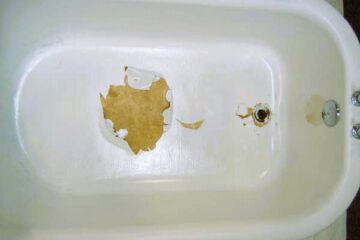
The first step in renovating your bathtub is to assess its current condition. Does your tub have chips or cracks? Is there rust or discoloration? Identifying these issues will help you determine whether you need a basic refinishing job or a more extensive repair.
If your tub has minor damage such as scratches, stains, or small chips, a bathtub refinishing kit should be enough. However, larger cracks or rust spots may require a tub repair kit to fill and seal the damage before moving forward.
Step 2: Clean the Bathtub Thoroughly
A clean surface is essential for achieving a smooth and durable finish. Begin by scrubbing the entire bathtub with a heavy-duty cleaner to remove soap scum, oils, and grime. Be sure to get into all the nooks and crannies. For mineral deposits or rust, use a specialized cleaner to remove them.
Once cleaned, rinse the tub thoroughly and allow it to dry completely. Any residue left on the surface can prevent the primer and paint from adhering properly.
Step 3: Repair Any Damage
If your bathtub has chips, cracks, or rust spots, now is the time to fix them. Use a tub repair kit to fill any damaged areas. Follow the instructions on the kit to apply the filler and smooth it out. Once the repair has dried, sand it down to create a smooth surface that blends seamlessly with the rest of the tub.
Step 4: Sand the Surface
Next, lightly sand the entire surface of the bathtub with fine-grit sandpaper. This step helps the primer and paint adhere to the tub by creating a slightly rough texture. Sanding also removes any lingering residue from previous repairs or coatings. After sanding, wipe down the tub with a damp cloth to remove dust and debris.
Step 5: Tape Off Surrounding Areas
To protect the walls and any surrounding areas from paint or primer splashes, use painter’s tape to tape off the edges of the tub. Cover the floor and any nearby surfaces with drop cloths or plastic sheets to prevent accidental spills.
Step 6: Apply Primer
Applying a high-quality primer designed for bathtubs is crucial for a long-lasting finish. The primer creates a strong bond between the tub surface and the epoxy paint, ensuring the coating adheres evenly.
Using a spray or roller (depending on the product), apply a thin, even coat of primer. Allow it to dry completely according to the manufacturer’s instructions. Most primers take about 30 minutes to an hour to dry.
Step 7: Apply the Epoxy Paint
Once the primer has dried, it’s time to apply the epoxy paint. Epoxy paint is highly durable and designed to withstand the moisture and wear that a bathtub experiences.
Apply the epoxy paint in thin, even coats using a spray gun, roller, or brush, depending on your kit. Most bathtub refinishing kits recommend applying two or three coats for the best finish. Be sure to allow each coat to dry completely before applying the next. This will prevent bubbling or uneven textures.
Step 8: Allow the Tub to Cure
After applying the final coat of epoxy paint, allow the tub to cure fully. Curing times can vary, but most products recommend waiting at least 24 to 72 hours before using the tub. During this time, avoid touching the surface to prevent smudges or dents in the finish.
What are the common mistakes to avoid during a renovation?
When it comes to renovating a bathtub, there are a few common mistakes that can lead to poor results. Here are some things to watch out for:
- Skipping Surface Preparation: Proper cleaning, sanding, and priming are essential for a smooth and durable finish. Don’t rush through these steps.
- Rushing the Drying Process: Patience is key. Applying new coats of paint or using the tub before it’s fully cured can ruin your hard work.
- Using the Wrong Products: Be sure to use materials designed specifically for bathtub refinishing. Regular household paint or primers won’t hold up in a wet environment like a bathroom.
How To Maintain Your Newly Renovated Bathtub?
Once your bathtub renovation is complete, you’ll want to keep it looking fresh for as long as possible. Here are a few maintenance tips:
- Use Non-Abrasive Cleaners: Harsh chemicals and abrasive scrubbing pads can damage the finish. Stick to gentle, non-abrasive cleaners to maintain the glossy look.
- Avoid Dropping Heavy Objects: Be cautious with heavy items like shampoo bottles or razors. Dropping them in the tub can cause chips or cracks in the surface.
- Regular Cleaning: Clean the tub regularly to prevent soap scum buildup and keep the surface looking shiny.
(FAQs)
Q1: How long will the new finish last?
With proper care, a re-glazed tub can last up to 10 years or more.
Q2: Can I repaint over a previously re-glazed bathtub?
Yes, but the old finish must be properly prepped and sanded before applying a new coat.
Q3: What should I do if I see chips after refinishing?
Chips can be repaired with a touch-up kit. Be sure to address them promptly to prevent further damage.
Q4: Is professional refinishing worth the extra cost?
If you’re inexperienced or the damage is severe, professional refinishing might offer better results and longevity.
Q5: How can I protect the finish from everyday use?
Avoid abrasive cleaners and be gentle with heavy objects. Regular cleaning with non-abrasive products is key.
Q6: How often should I refinish a bathtub?
Depending on use and care, refinishing should last 10-15 years.

[…] your hair at home is fun, but cleaning up hair dye stains in the Bathtub can be challenging. These stains can be tough to remove if they’re left untreated for too […]