Low water pressure in your bathroom sink can make everyday tasks frustrating and time-consuming. This issue is often caused by common problems such as clogged aerators, mineral build-up in the faucet, kinked water supply lines, or even debris blocking the water flow. Thankfully, these issues are usually easy to fix with a little effort. By cleaning the aerator, checking for kinks in the supply lines, or flushing out any blockages, you can restore the water pressure without needing professional help. In this guide, we’ll walk you through simple, step-by-step solutions to identify and resolve the problem quickly and effectively.
Table of Contents
Causes of Low Water Pressure in Bathroom Sinks
Low water pressure in your bathroom sink can be a real hassle, but most of the time, it’s caused by simple problems you can fix yourself. Here are the most common reasons:
- Clogged Aerator: The aerator is the small mesh part at the end of your faucet. Over time, it collects dirt, debris, and mineral deposits from the water, blocking the flow. If your water pressure feels weak, this is often the first thing to check. Luckily, cleaning or replacing the aerator is quick and easy.
- Kinked or Blocked Water Supply Line: The water supply lines under your sink can sometimes get bent or clogged with debris. When this happens, the water has a hard time reaching your faucet. Straightening the lines or flushing them out usually solves the problem.
- Worn-Out Faucet Parts: Inside your faucet, parts like cartridges help control the flow of water. If these parts are old or clogged with sediment, they can reduce water pressure. Replacing them can bring your faucet back to life.
- Faulty Water Pressure Regulator: If your entire home seems to have low water pressure, the problem could be with your water pressure regulator. A faulty regulator can limit the water flow to all fixtures, including your bathroom sink. Adjusting or repairing it can make a big difference.
Tools and Materials
Before you begin, make sure you have these tools and materials ready to make the process easier:
- Adjustable pliers or a wrench.
- Vinegar for cleaning.
- A small brush or toothbrush.
- A replacement aerator (if needed).
- A bucket or container to catch any water.
- Teflon tape (optional, for adjusting the supply line).
Simple Steps to Fix Low Water Pressure
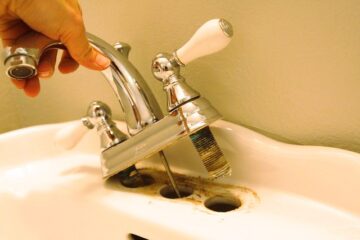
Step 1: Check and Clean the Aerator
Start by checking the aerator, the tiny screen at the end of your faucet. Mineral deposits, dirt, or debris often block the tiny holes in the aerator, reducing water flow.To fix this, remove the aerator by unscrewing it from the faucet. If it is stuck, use pliers, but wrap it in a cloth to prevent scratches. Once removed, soak the aerator in a bowl of vinegar for about 30 minutes to dissolve any mineral buildup. Use a small brush or toothbrush to clean off any leftover dirt. After cleaning, screw the aerator back onto the faucet and test the water pressure. If the issue persists, you may need to replace the aerator with a new one.

Step 2: Inspect and Clean the Faucet Components
If cleaning the aerator doesn’t improve water flow, the issue might be within the faucet. Start by turning off the water supply under the sink to prevent leaks while you work. Carefully disassemble the faucet, focusing on the cartridge or valves depending on the faucet’s design. Soak these components in vinegar or warm soapy water to remove blockages. Use a brush to scrub away any remaining debris. Check each part for signs of wear or damage, and replace any faulty components. Reassemble the faucet, turn the water supply back on, and test the pressure.
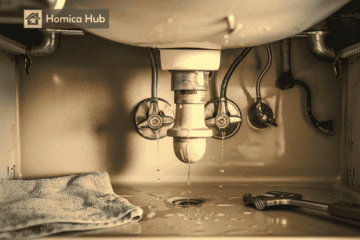
Step 3: Check and Flush the Water Supply Lines
Sometimes, the water supply lines under the sink are the cause of low pressure. Inspect the flexible hoses for any bends or kinks that could restrict water flow. Straighten them gently if needed. If no visible issues are present, disconnect the supply lines from the faucet and place the ends in a bucket. Slowly turn on the water supply to flush out any sediment or debris inside the lines. While disconnected, check the hoses for leaks or cracks and replace any damaged ones. Once you reconnect the supply lines to the faucet, turn on the water and test the pressure.
Step 4: Adjust the Water Pressure Regulator
If the low water pressure affects multiple faucets in your home, the issue might be the water pressure regulator. This device is usually located near your main water supply line. Use a wrench to adjust the regulator’s screw slightly. Turning it clockwise will increase the water pressure. Make small adjustments and test the water pressure in your sink after each one. If the regulator is malfunctioning or adjusting it doesn’t resolve the problem, it’s best to contact a professional plumber to repair or replace it.
By following these steps, you can resolve most low water pressure issues in your bathroom sink and enjoy a smooth, steady water flow again.

Future Care And Maintenance Tips
Preventing low water pressure in your bathroom sink requires regular maintenance and attention to potential problem areas. Cleaning the aerator and faucet components every few months can help prevent mineral buildup and debris from reducing water flow. It’s also essential to inspect your supply lines regularly for any signs of leaks, clogs, or kinks that could affect water pressure. Addressing plumbing issues as soon as they arise can prevent them from turning into more significant problems. If hard water is a recurring issue in your area, consider installing a water softener to minimize mineral deposits and keep your plumbing system running smoothly. These simple steps can ensure consistent water pressure and save you from future headaches.
When to Call a Professional Plumber?
If you’ve tried various DIY solutions and the water pressure issue still remains unresolved, it may be time to consider reaching out to a professional plumber. This is especially important if you notice that the problem is affecting multiple faucets throughout your home, indicating a more widespread issue. Furthermore, if you suspect there might be a significant problem with the main water line or the pressure regulator, it’s crucial to contact a plumber. These are more complex issues that require specialized tools and expertise to properly diagnose and fix. A professional can ensure the problem is addressed safely and effectively, preventing further damage to your plumbing system.
FAQs
Q: What should I do if cleaning the aerator doesn’t work?
If cleaning the aerator doesn’t solve the issue, check the faucet components and water supply lines for blockages or damage. You may also need to inspect the water pressure regulator.
Q: Can hard water affect water pressure?
Yes, hard water can cause mineral deposits to build up in the aerator and faucet components, reducing water pressure.
Q: How often should I clean the aerator?
Cleaning the aerator every three to six months can help maintain optimal water pressure.